Reserved Boxes and Statuses
Well that last big update for Atlas Quest went swimmingly, didn't it? =)
Now that I'm done hiking the Pacific Northwest Trail and have a bit a time, I've been revisiting the update, considering the feedback I've gotten about it and made a few tweaks. They're relatively minor this time around, though.
First, the concept of "reserved" boxes has largely been retired. When you start listing a new box, you won't find an option to mark your box as reserved--because it'll automatically be reserved until you explicitly "publish" the box. So reserved boxes still exist...you just don't "opt-in" to them like before.
And when it comes to adding or editing boxes, trackers, events, etc., I've decided on a naming convention that's consistent across all types of objects. On the "main editing" page--the page that shows at a glance all of the existing settings for the object in question--you'll see buttons to "Publish", "Save" or "Cancel."
 |
| You'll see three options when adding a new box: publish, save and cancel. "Publish" will list your box publicly and make it searchable on Atlas Quest. Use "Save" to store the box as a reserved box. And "Cancel," of course, will cancel the transaction. |
As you might guess, "Publish" will make your box/tracker/event/etc. and any data you've edited publicly available for all to see.
"Save" will only show up on boxes (not trackers, events, etc.) and will save the data to the database permanently, but the box will not be public until it's published. It is basically the "reserved" box from before. It only shows up for boxes because there's currently no support for "reserved" trackers, events, etc. If I ever add support to save unpublished trackers and events, you might see a "Save" button on those objects in the future. But for now, only boxes can be saved.
And the "Cancel" button is pretty self-explanatory. It ignores any data you've changed and throws it out.
The pages to edit individual pieces of data will have a "continue" and "cancel" button. The cancel button, once again, is self-evident. The "continue" button will save any changes you've made temporarily and return you to the main editing page where you can "publish" the changes (or "save" them if that option is available).
 |
| The 'edit data' pages will either take you back to the main editing page or cancel the current transaction on the specified page--but information is NOT saved permanently until you click either the "Publish" or "Save" button on the main editing page. |
Hopefully, these changes will help people avoid accidentally publishing unfinished listings which seemed to be a big issue after the update.
You will also be able to add plant dates to reserved boxes--but if you try to publish a box with a "future" date, it will convert into the current date. It will not allow you to list a plant date in the future for an active box! For a reserved box, yes, but not for active ones.
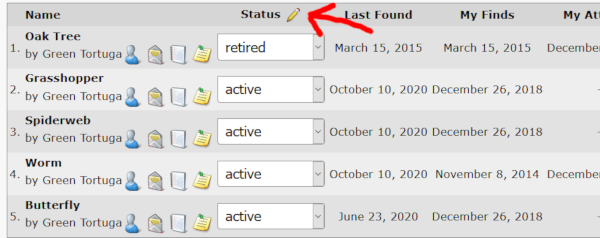
And finally, this next tweak allows you to edit a box, but from outside of the "edit box" pages. You'll find an option to edit the status of the entire series at once on the main details page of your box. Click the "edit" icon next to the "status" title of the series details section.